Bluetooth Usage (Seeed nrf52 mbed-enabled Boards Library)
Seeed Studio XIAO nRF52840 and Seeed Studio XIAO nRF52840 Sense both support Bluetooth connectivity. This wiki will introduce the basics Bluetooth function and provide a demo with 24GHz Respiratory Sleep Detection Module, used by "Seeed nrf52 mbed-enabled Boards Library".
Getting Started
Hardware Required
- 1 x Seeed Studio XIAO nRF52840 or Seeed Studio XIAO nRF52840 Sense
- 1 x Smartphone/PC with bluetooth connectivity
- 1 x USB Type-C cable
Software Required
Arduino Library Overview
If this is your first time using Arduino, we highly recommend you to refer to Getting Started with Arduino.
To use the Bluetooth functionality of Seeed Studio XIAO nRF52840, we need to use the official Arduino BLE library.
If you want to apply the Demo with 24GHz Sleep Breathing Radar, you may also need to download supported library as well.
Function
For an introduction to the functions and use of the code library ArduinoBLE, please refer to the Arduino website.
For an introduction to the functions and use of the code library Seeed 24GHz Sleep Breathing Radar BLE, please refer to the Wiki.
Installation
- Method One (This method is available for both of the above code libraries.)
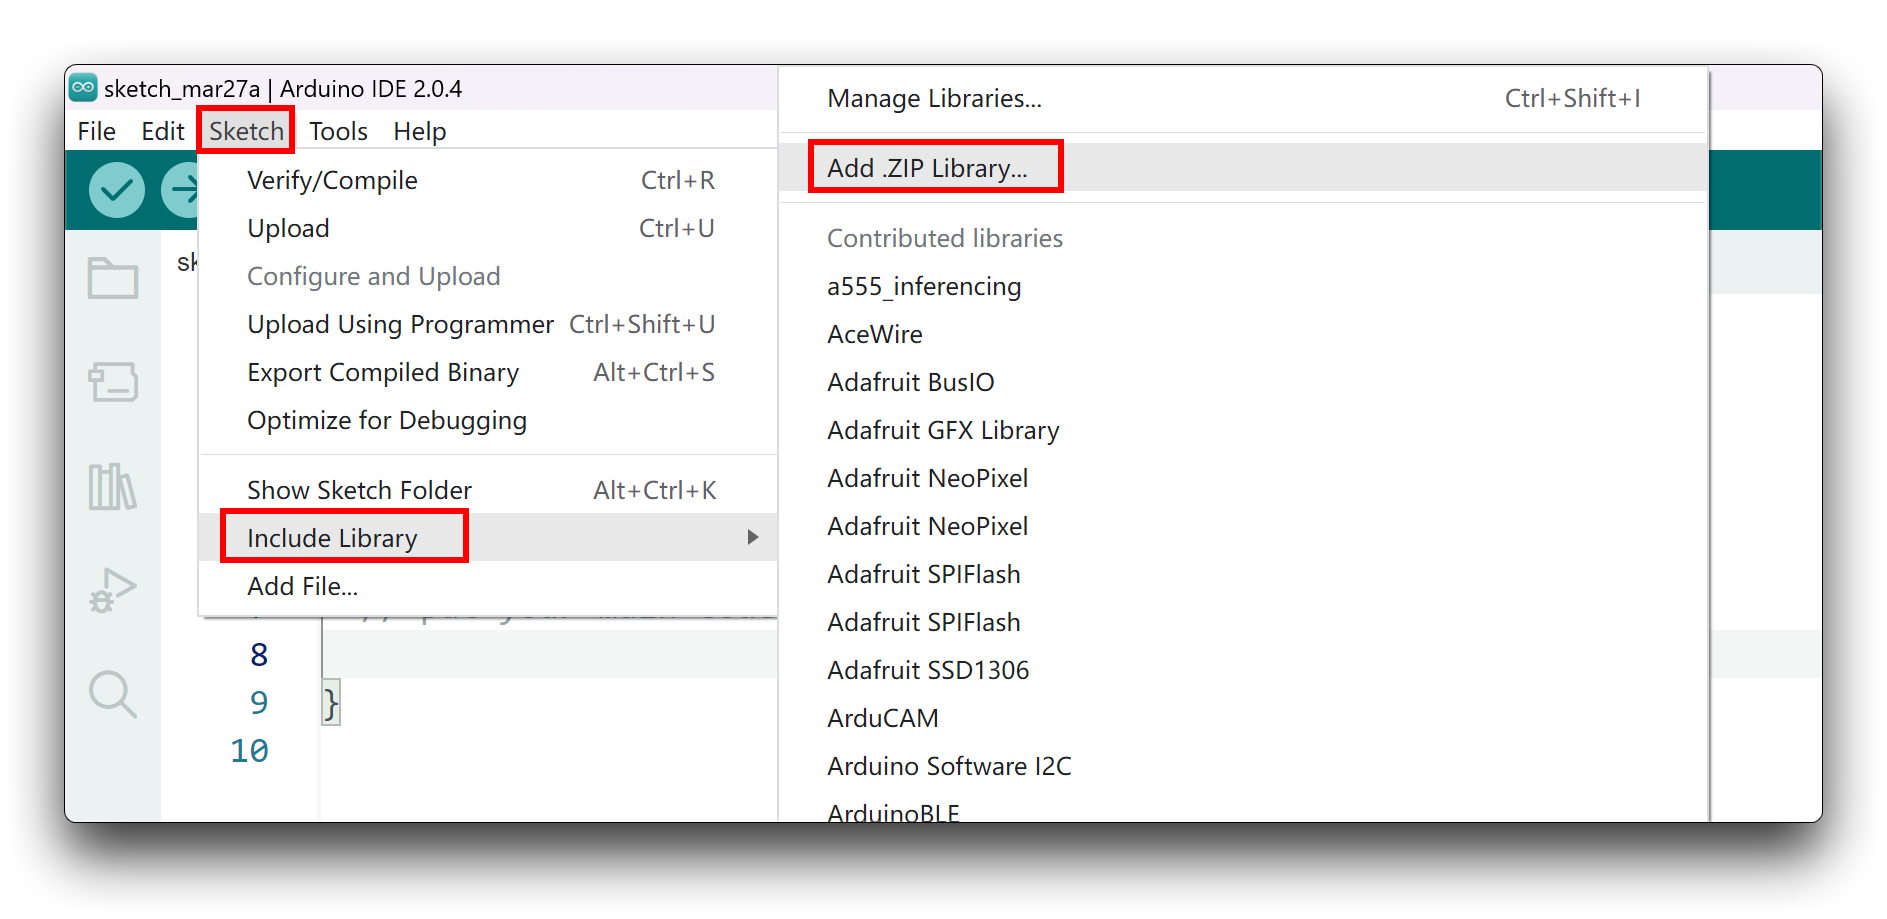
Since you have downloaded the zip Library, open your Arduino IDE, click on Sketch > Include Library > Add .ZIP Library. Choose the zip file you just downloaded,and if the library install correct, you will see Library added to your libraries in the notice window. Which means the library is installed successfully.
- Method Two (Only the ArduinoBLE library can be installed.)
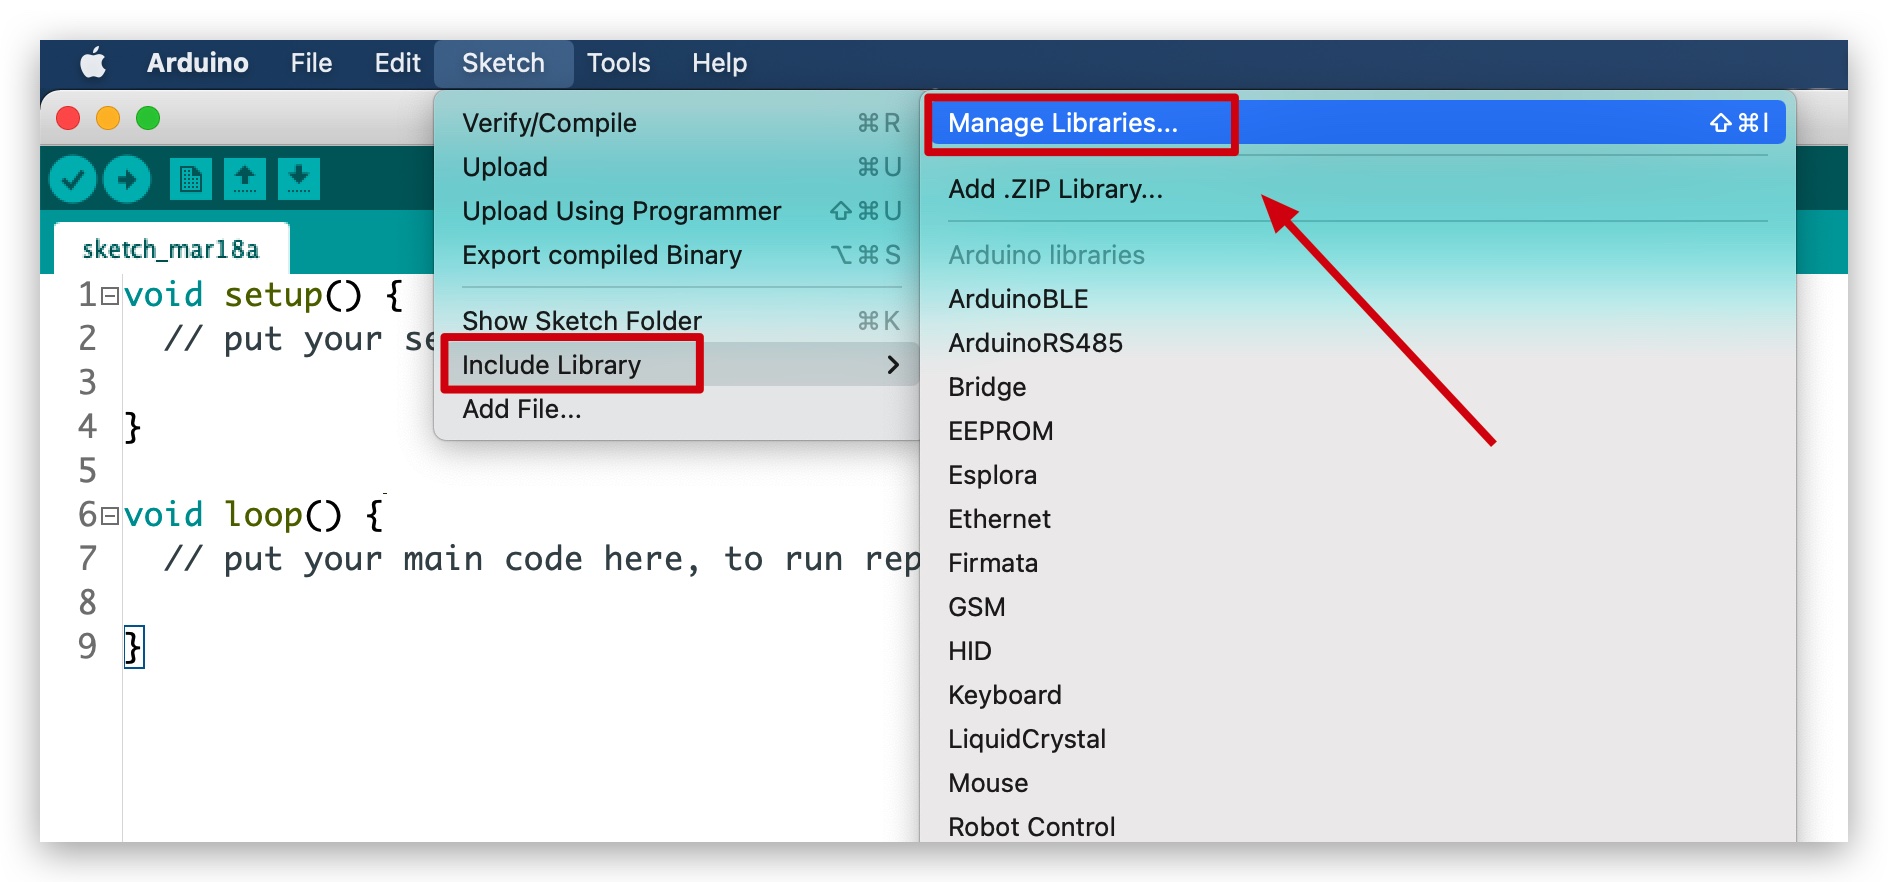
The library manager was added starting with Arduino IDE versions 1.5 and greater (1.6.x). It is found in the 'Sketch' menu under 'Include Library', 'Manage Libraries...'
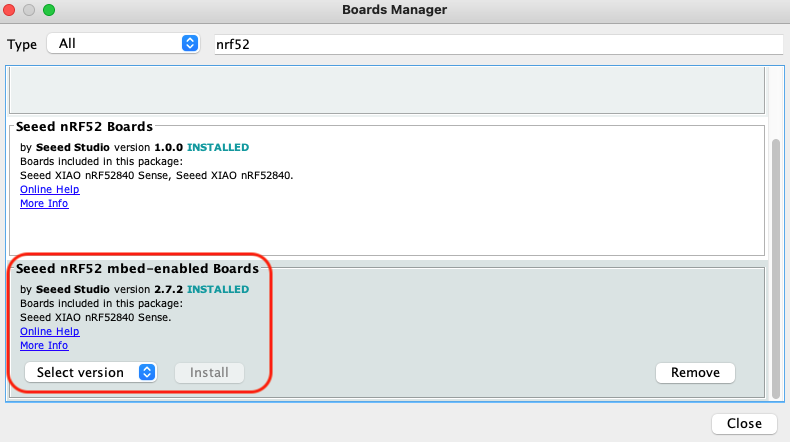
When you open the Library Manager you will find a large list of libraries ready for one-click install. To find a library for your product, search for the product name or a keyword such as 'k type' or 'digitizer', and the library you want should show up. Click on the desired library, and the 'Install' button will appear. Click that button, and the library should install automatically. When installation finishes, close the Library Manager.
Application examples
Now that we have our library installed and we understand the basic functions, let's run some examples for our Seeed Studio XIAO nRF52840 to see how it behaves.
Step 1. Launch the Arduino application.

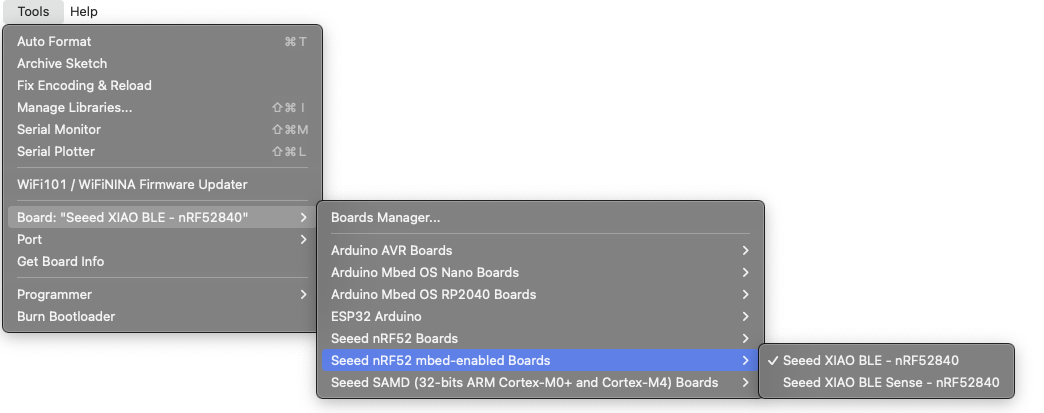
Step 2. Select your development board model and add it to the Arduino IDE. Here we are using "Seeed nrf52 mbed-enabled Boards Library".
For the boards libraries installation, please refer to this tutorial to finish installation.
Demo 1 Control built-in LED using a smartphone
In this example, we are going to connect the Seeed Studio XIAO nF52840 (Sense) and a smartphone using Bluetooth and send messages from the phone to turn ON/OFF the built-in Red LED on the Seeed Studio XIAO nRF52840 (Sense).
Please paste this code below into the Arduino IDE and upload it to the Seeed Studio XIAO nRF52840.
#include <ArduinoBLE.h>

BLEService ledService("19B10000-E8F2-537E-4F6C-D104768A1214"); // Bluetooth® Low Energy LED Service

// Bluetooth® Low Energy LED Switch Characteristic - custom 128-bit UUID, read and writable by central
BLEByteCharacteristic switchCharacteristic("19B10001-E8F2-537E-4F6C-D104768A1214", BLERead | BLEWrite);

const int ledPin = LED_BUILTIN; // pin to use for the LED

void setup() {
  Serial.begin(9600);
  while (!Serial);

  // set LED pin to output mode
  pinMode(ledPin, OUTPUT);

  // begin initialization
  if (!BLE.begin()) {
    Serial.println("starting Bluetooth® Low Energy module failed!");

    while (1);
  }

  // set advertised local name and service UUID:
  BLE.setLocalName("LED");
  BLE.setAdvertisedService(ledService);

  // add the characteristic to the service
  ledService.addCharacteristic(switchCharacteristic);

  // add service
  BLE.addService(ledService);

  // set the initial value for the characeristic:
  switchCharacteristic.writeValue(0);

  // start advertising
  BLE.advertise();

  Serial.println("BLE LED Peripheral");
}

void loop() {
  // listen for Bluetooth® Low Energy peripherals to connect:
  BLEDevice central = BLE.central();

  // if a central is connected to peripheral:
  if (central) {
    Serial.print("Connected to central: ");
    // print the central's MAC address:
    Serial.println(central.address());

    // while the central is still connected to peripheral:
  while (central.connected()) {
        if (switchCharacteristic.written()) {
          if (switchCharacteristic.value()) {
            Serial.println("LED on");
            digitalWrite(ledPin, LOW); // changed from HIGH to LOW
          } else {
            Serial.println(F("LED off"));
            digitalWrite(ledPin, HIGH); // changed from LOW to HIGH
          }
        }
      }

    // when the central disconnects, print it out:
    Serial.print(F("Disconnected from central: "));
    Serial.println(central.address());
  }
}
The key to the implementation of this example is the following paragraph.
  while (central.connected()) {
        if (switchCharacteristic.written()) {
          if (switchCharacteristic.value()) {
            Serial.println("LED on");
            digitalWrite(ledPin, LOW); // changed from HIGH to LOW
          } else {
            Serial.println(F("LED off"));
            digitalWrite(ledPin, HIGH); // changed from LOW to HIGH
          }
        }
      }
The purpose of this code is to enter a judgement when Seeed Studio XIAO nRF52840 is connected by a Bluetooth device central.connected() and receives content from the Bluetooth device switchCharacteristic.written(). If the value of the judgement is non-zero switchCharacteristic.value(), the light is on, if the judgement value is 0 the light is off.
Opening your serial monitor to a baud rate of 9600 and the led should be on or off. The output should look something like the below image.

At this point, control of the Seeed Studio XIAO nRF52840 light can be completed using the mobile app via Bluetooth, as described below.
| iPhone | Android | Description |
|---|---|---|
 |  | Open the software, search for a Bluetooth device called LED and click on Connect. Some devices may appear as Arduino. |
 |  | Go to the Seeed Studio XIAO nRF52840 Bluetooth interface and click on the device to display the device details. |
 |  | Fill in the data to be sent to the Seeed Studio XIAO nRF52840, send 1 to turn on the light, send 0 to turn off the light. |
 |  | Back in the Bluetooth control interface, you can see that the value has changed and the Seeed Studio XIAO nRF52840 red light is on (or off). |
 | ||
Demo 2 Use XIAO BLE to Obtain Data of 24GHz Sleep Detect Module via BLE
In this example, we will describe how to obtain the values of the sensors and send the information about the data detected by the sensors to the mobile device via Bluetooth with Seeed Studio XIAO nRF52840.
Follow the image below to connect the Seeed Studio XIAO nRF52840 board and 24GHz Respiratory Sleep Detection Module. For further information, you can click here.

Please open the example code in the library and upload it to Seeed Studio XIAO nRF52840.

//Radar_with_XIAOBLE_example

#include <ArduinoBLE.h>
#include <sleepbreathingradarBLE.h>

SleepBreathingRadarBLE radar;
BLEService radarService("19B10000-E8F2-537E-4F6C-D104768A1214"); // Bluetooth® Low Energy LED Service

// Bluetooth® Low Energy LED Switch Characteristic - custom 128-bit UUID, read and writable by central
BLEStringCharacteristic switchCharacteristic("19B10001-E8F2-537E-4F6C-D104768A1214", BLERead | BLENotify, 20);

int last_val = 0;

void setup() {
  Serial.begin(9600);
  radar.SerialInit();
  while (!Serial);

  // begin initialization
  if (!BLE.begin()) {
    Serial.println("starting Seeed Studio XIAO nRF52840 with 60GHz radar sensor demo failed!");
    while (1);
  }

  // set advertised local name and service UUID:
  BLE.setLocalName("Seeed Studio XIAO nRF52840");
  BLE.setAdvertisedService(radarService);

  // add the characteristic to the service
  radarService.addCharacteristic(switchCharacteristic);

  // add service
  BLE.addService(radarService);

  // start advertising
  BLE.advertise();

  Serial.println("Seeed Studio XIAO nRF52840 active, waiting for connections...");
}

void loop() {
  // listen for Bluetooth® Low Energy peripherals to connect:
  BLEDevice central = BLE.central();

  // if a central is connected to peripheral:
  if (central) {
    Serial.print("Connected to central: ");
    // print the central's MAC address:
    Serial.println(central.address());

    // while the central is still connected to peripheral:
    while (central.connected()){
       radar.recvRadarBytes();                       //Receive radar data and start processing
       if (radar.newData == true) {                  //The data is received and transferred to the new list dataMsg[]
          byte dataMsg[radar.dataLen+3] = {0x00};
          dataMsg[0] = 0x53;                         //Add the header frame as the first element of the array
          for (byte n = 0; n < radar.dataLen; n++)dataMsg[n+1] = radar.Msg[n];  //Frame-by-frame transfer
          dataMsg[radar.dataLen+1] = 0x54;
          dataMsg[radar.dataLen+2] = 0x43;
          radar.newData = false;                     //A complete set of data frames is saved
          int new_val = radar.Sleep_inf(dataMsg);    //Use radar built-in algorithm to output human motion status
          if(new_val != last_val){
            radar.OutputAssignment(new_val);
            switchCharacteristic.setValue(radar.str);
            last_val = new_val;
          }
        }
    }

    // when the central disconnects, print it out:
      Serial.print(F("Disconnected from central: "));
      Serial.println(central.address());
    }
}
In this example, the function that sends data to the mobile device is setValue(). If you want to get a real time display of the data you need to add BLENotify to this code below. The last parameter, 20, indicates the maximum length of data you can send.
BLEStringCharacteristic switchCharacteristic("19B10001-E8F2-537E-4F6C-D104768A1214", BLERead | BLENotify, 20);
Opening your serial monitor to a baud rate of 9600 should show the distance between the sensor and the object it's pointed at in both millimeters and feet. The output should look something like the below image.

Next, we can obtain the live data sent by Bluetooth by following the steps below.
| iPhone | Android | Description |
|---|---|---|
 |  | Open the software, search for a Bluetooth device called Seeed Studio XIAO nRF52840 and click on Connect. Some devices may appear as Arduino. |
= |  | Go to the Seeed Studio XIAO nRF52840 Bluetooth interface and click on the device to display the device details. |
 |  | Open the software's live update data. |
 |  | Next, whenever the radar detects a sleep message, it is sent to the phone via Seeed Studio XIAO nRF52840's Bluetooth. |
 | ||
Demo 3 Two XIAO nRF52840 control LED via Bluetooth communication
In this example, we will use two XIAO nRF52840, using their Bluetooth capabilities to communicate. One of the XIAOs acts as a host and is connected to the XIAO expansion board, sending control commands via the expansion board's buttons. The other XIAO acts as a slave.
Before you start, please be prepared to do the following.
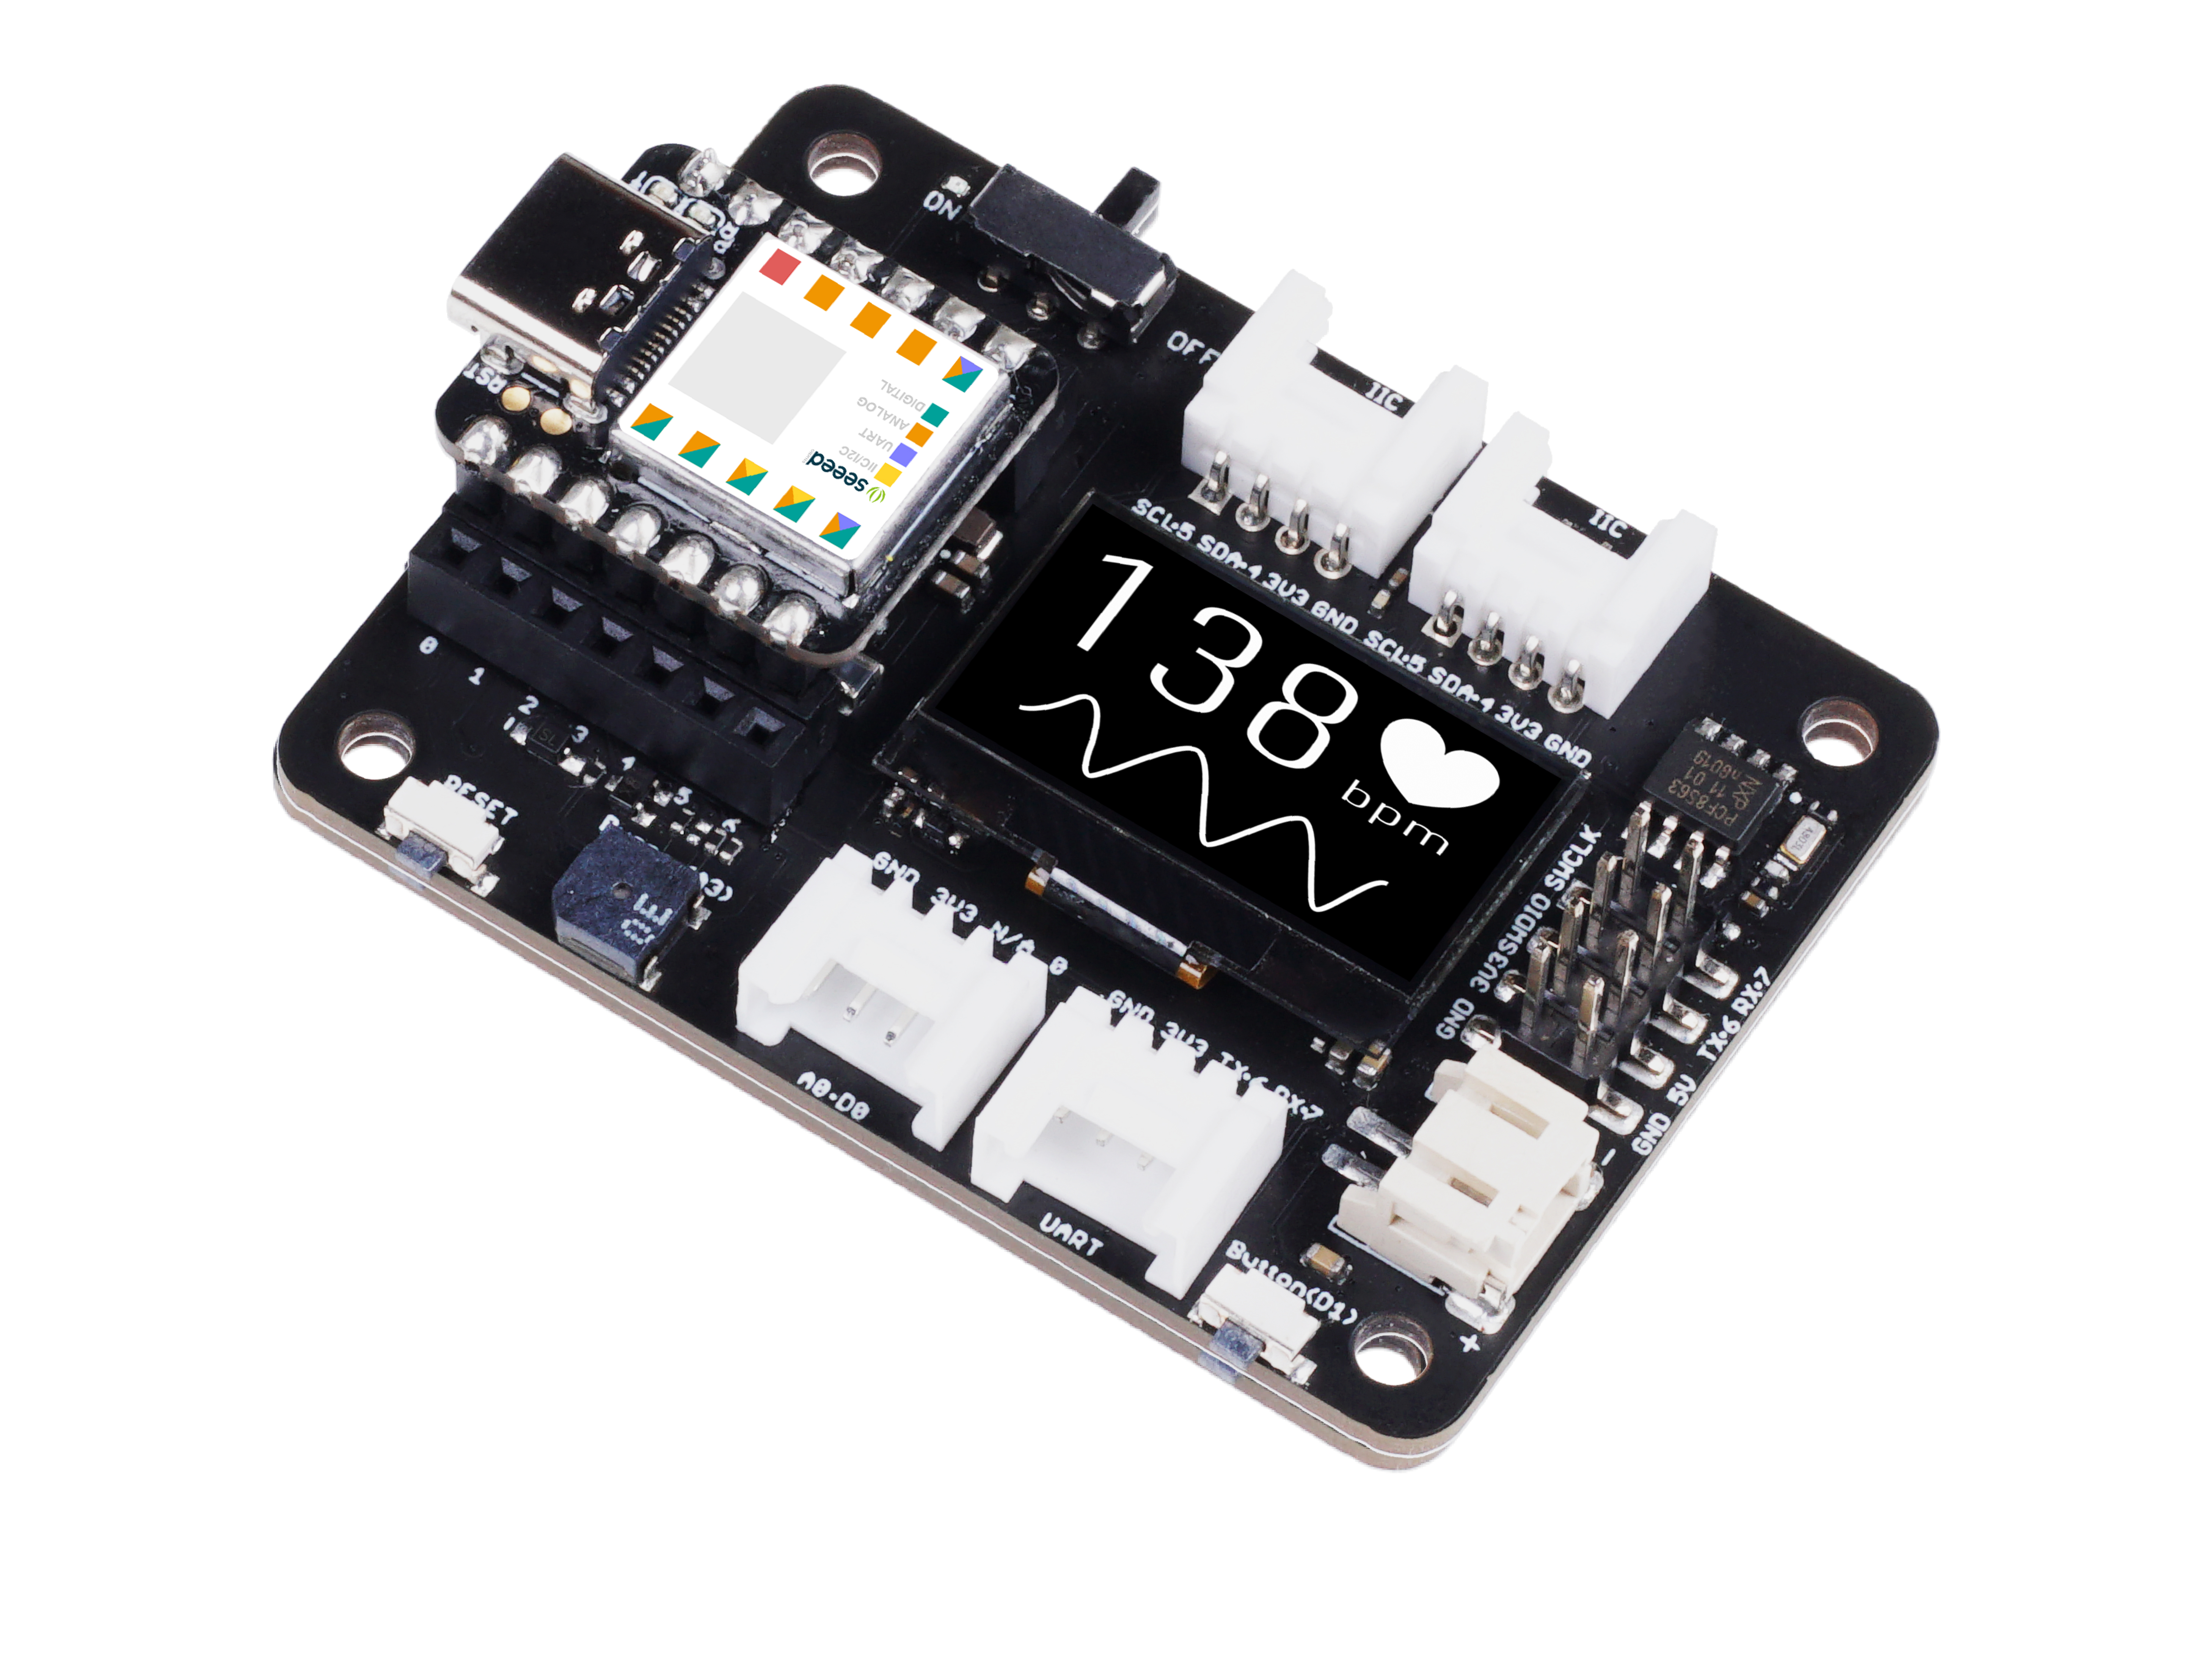 |  |
| Seeed Studio XIAO Expansion board | 2 x Seeed XIAO BLE nRF52840 Sense |
Please select one of the XIAO nRF52840, which does not require any device to be connected, and upload the program below directly.
#include <ArduinoBLE.h>

BLEService ledService("19B10000-E8F2-537E-4F6C-D104768A1214"); // Bluetooth® Low Energy LED Service

// Bluetooth® Low Energy LED Switch Characteristic - custom 128-bit UUID, read and writable by central
BLEByteCharacteristic switchCharacteristic("19B10001-E8F2-537E-4F6C-D104768A1214", BLERead | BLEWrite);

const int ledPin = LED_BUILTIN; // pin to use for the LED

void setup() {
  Serial.begin(9600);
  while (!Serial);

  // set LED pin to output mode
  pinMode(ledPin, OUTPUT);

  // begin initialization
  if (!BLE.begin()) {
    Serial.println("starting Bluetooth® Low Energy module failed!");

    while (1);
  }

  // set advertised local name and service UUID:
  BLE.setLocalName("XIAO");
  BLE.setAdvertisedService(ledService);

  // add the characteristic to the service
  ledService.addCharacteristic(switchCharacteristic);

  // add service
  BLE.addService(ledService);

  // set the initial value for the characeristic:
  switchCharacteristic.writeValue(0);

  // start advertising
  BLE.advertise();

  // print address
  Serial.print("Address: ");
  Serial.println(BLE.address());

  Serial.println("XIAO nRF52840 Peripheral");
}

void loop() {
  // listen for Bluetooth® Low Energy peripherals to connect:
  BLEDevice central = BLE.central();

  // if a central is connected to peripheral:
  if (central) {
    Serial.print("Connected to central: ");
    // print the central's MAC address:
    Serial.println(central.address());

    // while the central is still connected to peripheral:
    while (central.connected()) {
      // if the remote device wrote to the characteristic,
      // use the value to control the LED:
      if (switchCharacteristic.written()) {
        if (switchCharacteristic.value()) {   // any value other than 0
          Serial.println("LED on");
          digitalWrite(ledPin, HIGH);         // will turn the LED on
        } else {                              // a 0 value
          Serial.println(F("LED off"));
          digitalWrite(ledPin, LOW);          // will turn the LED off
        }
      }
    }

    // when the central disconnects, print it out:
    Serial.print(F("Disconnected from central: "));
    Serial.println(central.address());
  }
}
The main purpose of this program is to make XIAO a Bluetooth device called "XIAO" that can be searched for and connected to by other Bluetooth devices. Once connected, you can control the LEDs on the XIAO by sending a 0 or a 1 to turn them off or on respectively.
Put the Seeed Studio XIAO nRF52840 on the expansion board.
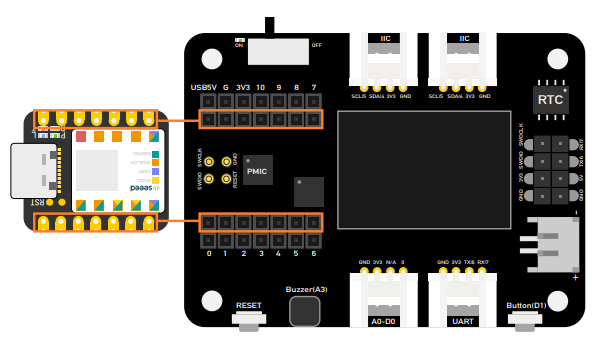
And for this purpose the XIAO with the extension board connected uploads the following procedure.
#include <ArduinoBLE.h>
#include <U8x8lib.h>
#include <Wire.h>

// variables for button
const int buttonPin = D1;
int oldButtonState = LOW;

void setup() {
  Serial.begin(9600);
  while (!Serial);

  // configure the button pin as input
  pinMode(buttonPin, INPUT_PULLUP);

  // initialize the Bluetooth® Low Energy hardware
  BLE.begin();

  Serial.println("Bluetooth® Low Energy Central - LED control");

  // start scanning for peripherals
  BLE.scanForName("XIAO");
}

void loop() {
  // check if a peripheral has been discovered
  BLEDevice peripheral = BLE.available();
  if (peripheral) {
    // discovered a peripheral, print out address, local name, and advertised service
    Serial.print("Found ");
    Serial.print(peripheral.address());
    Serial.print(" '");
    Serial.print(peripheral.localName());
    Serial.print("' ");
    Serial.print(peripheral.advertisedServiceUuid());
    Serial.println();

    if (peripheral.localName() != "XIAO") {
      return;
    }

    // stop scanning
    BLE.stopScan();

    system_control(peripheral);

    // peripheral disconnected, start scanning again
    BLE.scanForName("XIAO");
  }
  delay(100);
}

void system_control(BLEDevice peripheral) {
  // connect to the peripheral
  Serial.println("Connecting ...");

  if (peripheral.connect()) {
    Serial.println("Connected");
  } else {
    Serial.println("Failed to connect!");
    return;
  }

  // discover peripheral attributes
  Serial.println("Discovering attributes ...");
  if (peripheral.discoverAttributes()) {
    Serial.println("Attributes discovered");
  } else {
    Serial.println("Attribute discovery failed!");
    peripheral.disconnect();
    return;
  }

  // retrieve the LED characteristic
  BLECharacteristic ledCharacteristic = peripheral.characteristic("19b10001-e8f2-537e-4f6c-d104768a1214");

  if (!ledCharacteristic) {
    Serial.println("Peripheral does not have LED characteristic!");
    peripheral.disconnect();
    return;
  } else if (!ledCharacteristic.canWrite()) {
    Serial.println("Peripheral does not have a writable LED characteristic!");
    peripheral.disconnect();
    return;
  }

  while (peripheral.connected()) {
    // while the peripheral is connected
    // read the button pin
    int buttonState = digitalRead(buttonPin);

    if (oldButtonState != buttonState) {
      // button changed
      oldButtonState = buttonState;

      if (buttonState) {
        Serial.println("button pressed");

        // button is pressed, write 0x01 to turn the LED on
        ledCharacteristic.writeValue((byte)0x01);
      } else {
        Serial.println("button released");

        // button is released, write 0x00 to turn the LED off
        ledCharacteristic.writeValue((byte)0x00);
      }
    }
  }

  Serial.println("Peripheral disconnected");
}
Once you have uploaded the program, turn on the serial monitor and the program will start searching for a nearby Bluetooth device with the local name "XIAO" and connect to it (you will need to wait 1 to 3 minutes).
Once the successful connection message is displayed in the serial monitor, you can control the switching of the other XIAO nRF52840 LED via key D1 of the expansion board.
Of course, if you don't have an extension board, you can also use your own buttons or other devices.
What's more?
If you want to try out more examples you can navigate to File > Examples > INCOMPATIBLE > ArduinoBLE and check all the examples under ArduinoBLE
Tech Support
Please do not hesitate to submit the issue into our forum.

